Please follow the technical instructions below to insure the quality and timely delivery of your graphic panels.
If you have any questions please contact grafik@best-sytems.com or call +43 / 1 / 86 54 082-0 and ask for the graphic department.
Prints / panels for display systems – please see cutting templates for dimensions and finishing.
Graphic files will be checked for proper resolution, correct dimensions and colors and we will contact you if we see a problem.
If you are not the person handling the graphic design, please pass this information along to the person who will be designing your art.
File preparation information
- Ideal file – PDF/X-1a (PDF 1.3 & 1.4 compatibility) or PDF/X-4 Acrobat 6.
- Fonts – please embed fonts or convert the text into paths.
- Resolution - minimum resolution is 100dpi in final format at 100% scale.
- Cutting Templates – please see the cutting templates for your display for exact design dimensions and live graphic area.
- Bleed – please use crop marks and add a 3 – 5 mm bleed, except for fabric prints with silicon lips we need 20mm bleed on all sides.
- Do not include any pages or graphic elements that should not be printed in your print file. Only submit what is supposed to be printed.
- Please submit (if possible) in a separate file all picture data, logos and fonts to allow us to make corrections to color or resolution if necessary.
- Control file – if one is available, please submit a low resolution control file for reference.

Acceptable file types
You are welcome to use other file types such as .tiff, .jpg, Adobe InDesign or Adobe Illustrator files. We prepare all files for print on a PC using Adobe Creative Cloud. Please be aware that we need all picture data, logos and fonts separately as well. To help us checking the data please send a control-pdf too.
colour & printing profile
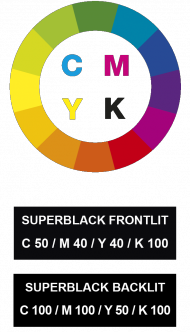
We print in CMYK-mode with colour profile ISOCoated_v2. Please use the same profile and make sure the program colour mode is set on CMYK.
Print data including special colours, RGB- and LAB-colour mode will automatically be changed into CMYK-colour mode. As the CMYK-colour environment is not as large, small colour differences can arise.
For the darkest / best black, please set your black colours for frontlit prints to CMYK 50/40/40/100 and backlit print CMYK 100/100/50/100.
If colour definitions are required, please give colour definitions according to Pantone Solid To Process Euro Coated or send us samples for matching. If a Pantone Color is not specified and no samples are sent to us for matching, we cannot accept returns for colour differences.
overprint
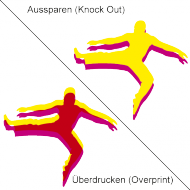
Do not overlap colors / overprint in your graphic file. If two colours are overlapping / overprint, a mixed colour appears. For example when black and yellow overlap, the result would be a brown color.
graphic & print
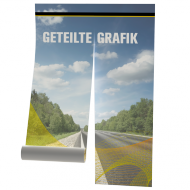
For multiple panel walls that join together, please submit your print file as a single image and allow us to split the image across the panels. If a cut between panels must be aligned to a specific place, please let us know when submitting the print files.
cutting & drilling
To insure accuracy of cuts and drilled holes, cut / hole marks must be placed as an outline / contour with 0.25 pt. line thickness, set on overprint, and in solid colour mode M100% / Y100% marked as “crease”.
outline cut
For curved / non-straight cuts, please place a cutting line / path in the print file.The cutting path should be defined with a 0.25 pt line thickness, on overprint, and in solid colour mode Magenta 100% marked as “cut”. To avoid white edges / rims, please check to make sure that the cutline fits exactly on your graphic. Define the cutting path using the minimum number of anchor points. All cutting paths need to be closed.
grommet attachment
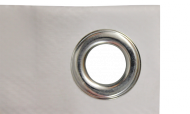
For banners with reinforced edges, please place the grommets 1.7 cm / 0.7” from the edge. For banners without reinforced edges, please place the grommets 2.5 cm / 0.8” from the edge.
If you need grommets / eyelets in specific places on your banner, please add special marks on your print file. Marks for banners with reinforced edges need to be placed 1.7 cm / 0.7’’ from the edge, and for banners without reinforcement the distance is 2.5 cm / 0.8’’.
Please choose a line color which will be visible on your print file. It is not necessary to add extra material / space on your print file for reinforcements – this will be automatically added during production.
is there enough resolution?
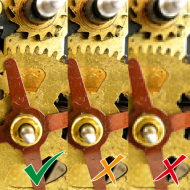
Check your print file at 100% size and full zoom (100%) to make sure everything looks good at full size.
Open your PDF in Photoshop and rasterize to final format with 100dpi and review your file. This will give you a better look at the final output to check for clarity of photos and graphic elements.
When reviewing your graphic file, please keep in mind the distance at which the panels will be viewed.
no better data available?
If you are submitting files with slightly blurry or lower resolution image files and there are no better files available, let us know when submitting the print file. This will speed up the production process and make sure that we don’t hold up printing while checking back with you to see if better images are available.
preparing large format printing files
Some graphic design programs are limited in the size of the file they can produce or use. When preparing large format printing files for large displays or prints, this can become a problem. You are welcome to scale your graphics to a smaller size if necessary to reduce the files size. Please inform us about the scale you use when you submit the print file to ensure that we produce the proper size graphic panel. Please be aware of the resolution of the print file when using a reduced scale.
For example – a layout with 1:10 scaling, never place a picture with 100dpi at bigger than 10% or you will reduce the resolution with every percent. If you need make the image in your print file larger, it is better to increase the picture on final format with 100dpi and replace it in your layout.
Please also take care on file compression during the export. A file with scale 1:10 and compression on 100dpi has 10dpi at final format.
You can use Adobe InDesign to verify the effective PPI of each image in your print file.
labeling of print files
A distinct labeling of the print files is very helpful and helps to avoid mistakes.
the gradient appears to be stepped
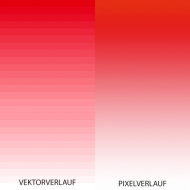
Often vectorized colour gradients seem to be stepped or have lines when printed. You can avoid these issues by using a Photoshop rasterized or pixel colour gradients. You can add a 1 to 1.5% noise filter to help smooth your gradient.
Sometimes the rasterized gradient will slow down your computer during the design process. To avoid this, use the vectorized colour gradient during design and substitute the rasterized gradient at the end of the design process.

